C# Mini Project - Car Rental program detailed overview
In this article, we will be reviewing a simple Windows program which can be used to manage a car rental company. The program is synced to a MS SQL Server database and it features basic features like registration of cars and customers, tracking of rentals and returns.
Front-end uses Windows Forms UI framework and the development is done in Visual Studio. The source code is available at this link.
Database overview
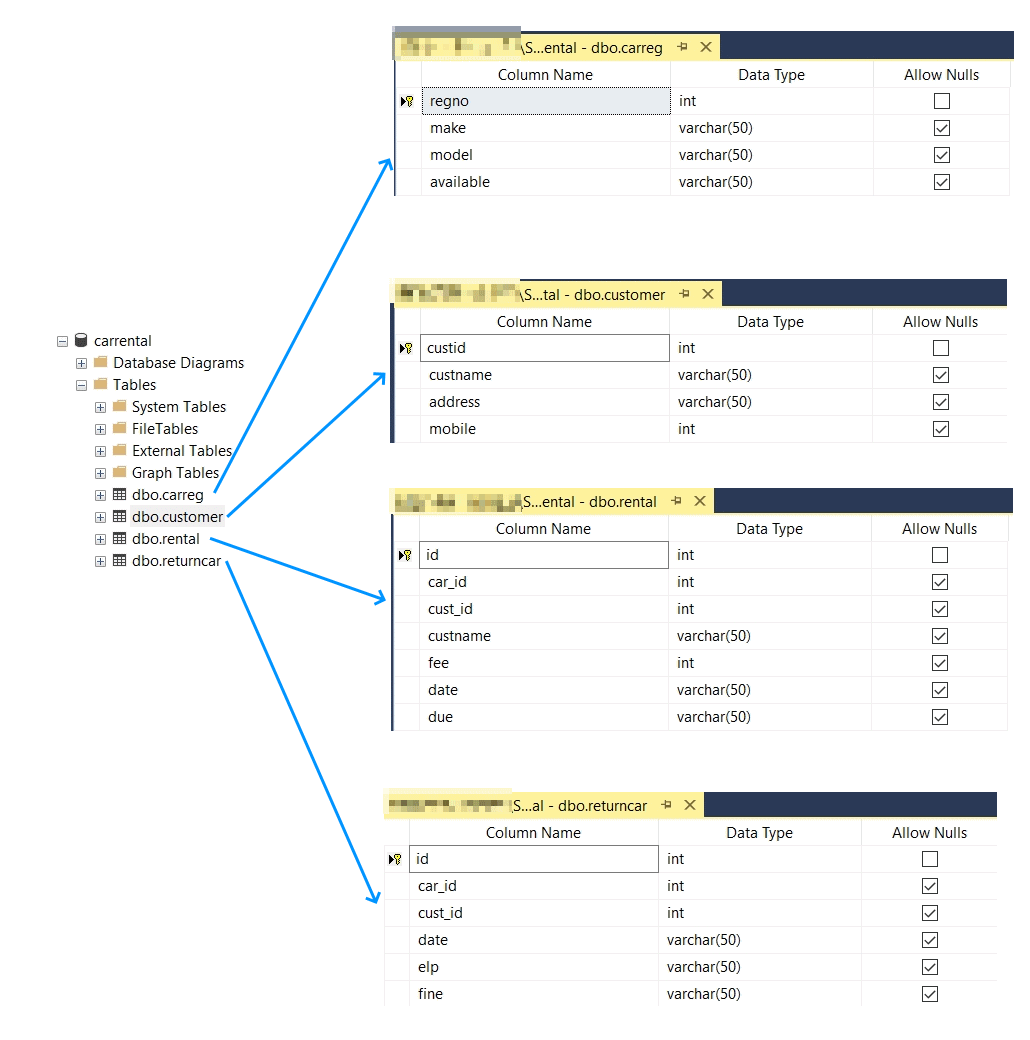
The database part is done in SQL Server and it consists of four simple tables:
- dbo.carreg is the table where rental cars are registered,
- dbo.customer is the table for customers records,
- dbo.rental tracks rentals with date records,
- dbo.returncar manages returns of cars, i.e., termination of rentals.
Note: dbo prefix is automatically added on the creation of tables in SQL Server Management Console, they can be referenced with and without this prefix.
Structure of the program
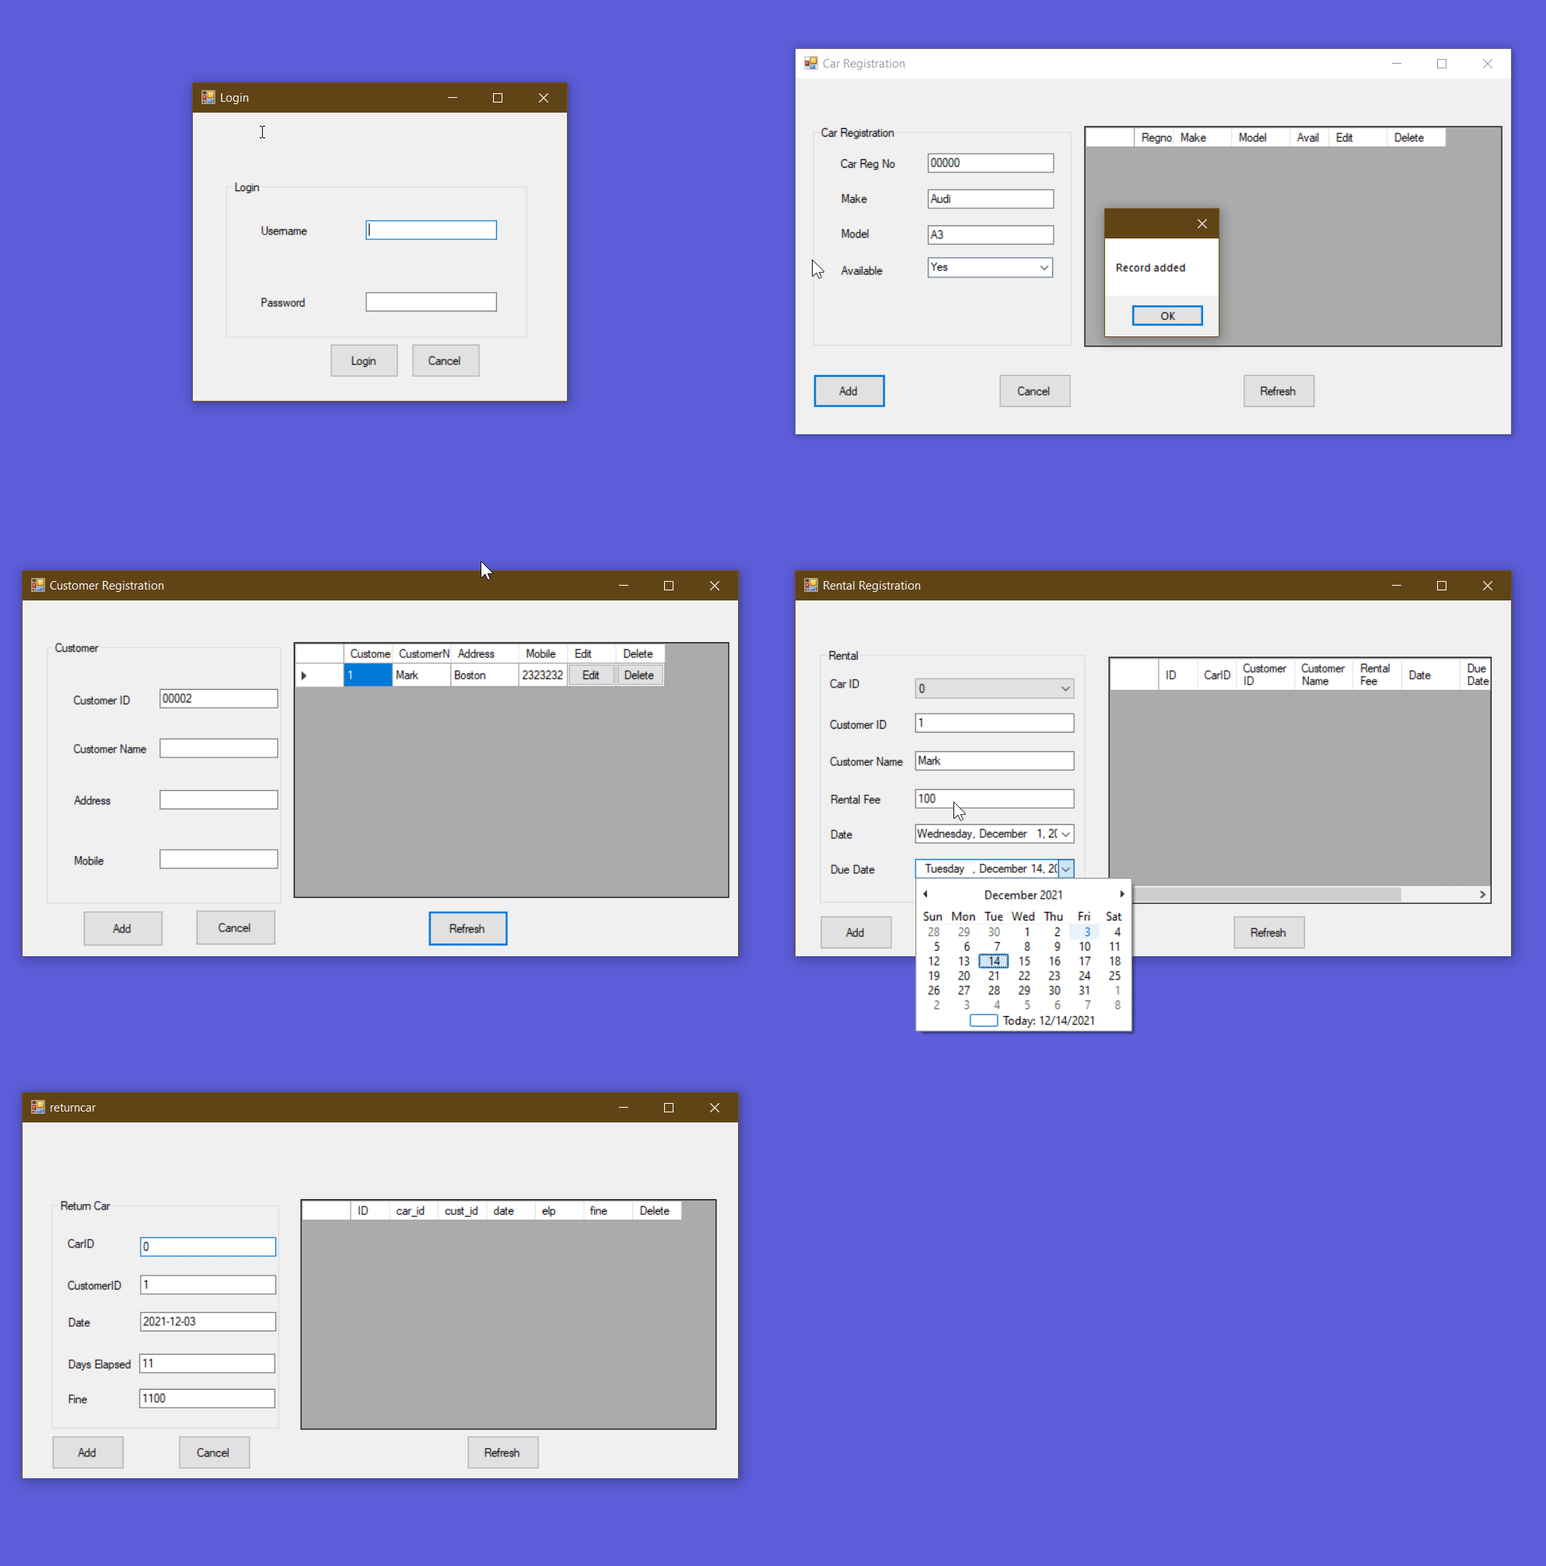
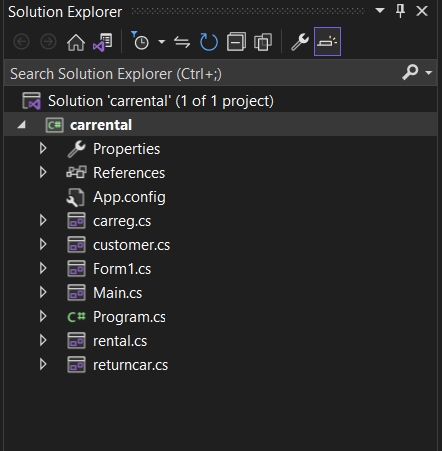
A program consists of the login screen, main window and sub-windows for each option (car registration, customer data, rental and return records). The main Program.cs section calls the Form1.cs and so the program is being run. The program consists of multiple .cs files which are separate classes itself. They are designed using Windows Forms UI elements from the Visual Studio corresponding toolbar.
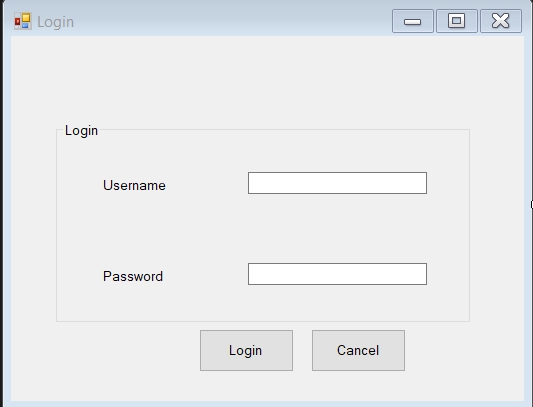
Login screen (Form1.cs)
This simple form consists of two textboxes and two buttons. There is a predefined username (testadmin) and password (123) which is checked upon the click on the Login button. If the username and password are correctly entered, the program then creates a new instance of the class Main and displays it.
1
2
3
4
5
6
7
8
9
10
11
12
13
14
15
16
17
18
19
private void button1_Click(object sender, EventArgs e)
{
    string uname = txtuname.Text;
    string pass = txtpass.Text;

    if (uname.Equals("testadmin") && pass.Equals("123"))
    {
        Main m = new Main();
        this.Hide();
        m.Show();
    }
        else
    {
        MessageBox.Show("Username or password do not match");
        txtuname.Clear();
        txtpass.Clear();
        txtuname.Focus();
    }
}
Main window (Main.cs)
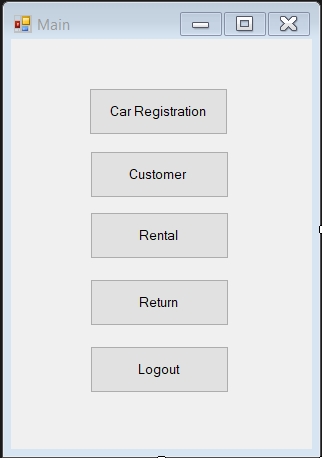
This section simply creates objects (class instances of the corresponding classes) and displays them via the buttonX_click method:
1
2
3
4
5
6
7
8
9
10
11
12
13
14
15
16
17
18
19
20
21
22
23
24
25
26
27
28
private void button1_Click(object sender, EventArgs e)
{
    carreg c = new carreg();
    c.Show();
}

private void button2_Click(object sender, EventArgs e)
{
    customer c = new customer();
    c.Show();
}

private void button3_Click(object sender, EventArgs e)
{
    rental r = new rental();
    r.Show();
}

private void button4_Click(object sender, EventArgs e)
{
    returncar r=new returncar();
    r.Show();
}

private void button5_Click(object sender, EventArgs e)
{
    this.Close();
}
Car registration (carreg.cs)
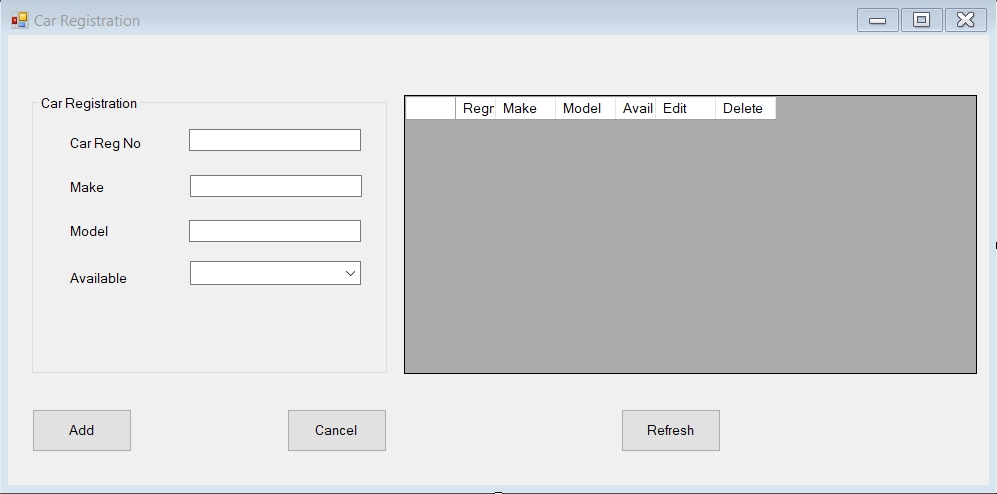
From the designer’s viewpoint, this form consists of multiple elements like textboxes, buttons, grids, etc. Obviously, user can enter a registration number, make and model, and to mark whether the auto is available or not. Those data is then entered into the database and displayed within the DataGridView element on the right side. Let’s examine the most important parts of this structures and their link to the underlying code.
The connection to the SQL Server is established by following code:
1
2
3
4
5
6

using System.Data.SqlClient;

SqlConnection con = new SqlConnection("Data Source=DESKTOP-N5IF2SJ\\SQLEXPRESS; Initial Catalog=carrental; User ID=testadmin; Password=123;");
SqlCommand cmd;
SqlDataReader dr;
Notice that this code will be the same in the other parts of the program. The objects cmd and dr are instances of the SqlCommand and SqlDataReader classes; the first one provides the possibility of entering the SQL commands, another one executes SqlDataReader objects.
The class consists of multiple methods which are repeated throughout the project. The method load() loads the data from the carreg table into the DataGridView element:
1
2
3
4
5
6
7
8
9
10
11
12
13
14
public void load()
{
    sql = "select * from carreg";
    cmd = new SqlCommand(sql,con);
    con.Open();
    dr = cmd.ExecuteReader();
    dataGridView1.Rows.Clear();

    while(dr.Read())
    {
        dataGridView1.Rows.Add(dr[0], dr[1], dr[2], dr[3]);
    }
        con.Close();
}
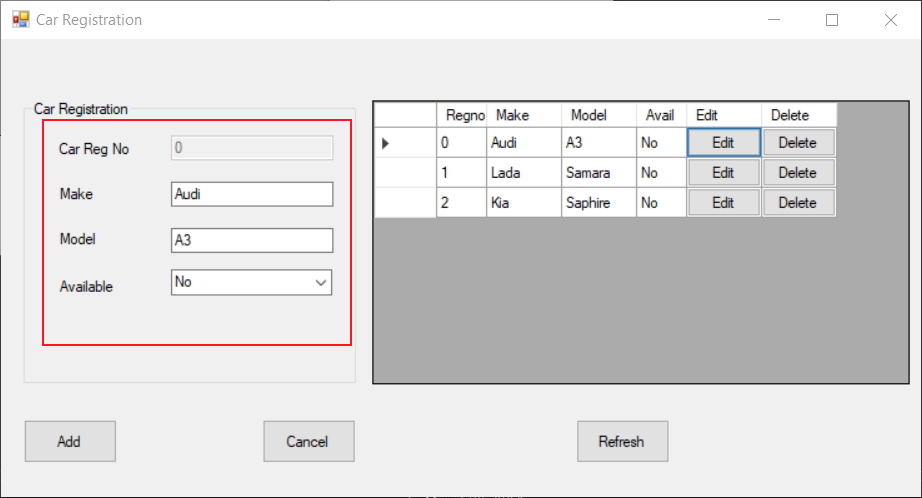
The method getid() displays the data from carreg table into the outlined textbox fields. This method is called later when editing the car data records.
1
2
3
4
5
6
7
8
9
10
11
12
13
14
15
16
17
public void getid(string id)
{
    sql = "select * from carreg where regno='" + id + "'";
    cmd = new SqlCommand(sql,con);
    con.Open();
    dr = cmd.ExecuteReader();

    while(dr.Read())
    {
        txtregno.Text = dr[0].ToString();
        txtmake.Text = dr[1].ToString();
        txtmodel.Text = dr[2].ToString();
        txtavl.Text = dr[3].ToString();

    }
        con.Close();
}
Notice how this line enables the calling of the records with different ID numbers by declaring string variable id and escaping the characters while doing the SQL call:
1
2

    sql = "select * from carreg where regno='" + id + "'";
The data from the database is then parsed to the corresponding text boxes.
button1 click event
The button “Add” has internal name button1. When the user click add, the entered data from the textboxes are entered into the database. This button has also a second function, which is update of selected records within database. Via the variable Mode, the selection is being made whether the new data is inserted into the database, or the existing data is being edited. The variable is also being used by another method which can change the state.
1
2
3
4
5
6
7
8
9
10
11
12
13
14
15
16
17
18
19
20
21
22
23
24
25
26
27
28
29
30
31
32
33
34
35
36
37
38
39
40
41
42
43
44
45
46
47
48
49
50
51

private void button1_Click(object sender, EventArgs e)
{
    string regno = txtregno.Text;
    string make = txtmake.Text;
    string model = txtmodel.Text;
    string aval = txtavl.SelectedItem.ToString();

    if(Mode==true)
    {
        sql = "insert into carreg(regno, make, model, available) values(@regno, @make, @model, @available)";
        con.Open();
        cmd = new SqlCommand(sql, con);
        cmd.Parameters.AddWithValue("@regno", regno);
        cmd.Parameters.AddWithValue("@make", make);
        cmd.Parameters.AddWithValue("@model", model);
        cmd.Parameters.AddWithValue("@available", aval);
        cmd.ExecuteNonQuery();
        MessageBox.Show("Record added");

        txtmake.Clear();
        txtmodel.Clear();
        txtmake.Focus();


    }
        else
        {

            sql = "update carreg set make=@make,model=@model,available=@available where regno=@regno";
            con.Open();
            cmd = new SqlCommand(sql, con);

            cmd.Parameters.AddWithValue("@make", make);
            cmd.Parameters.AddWithValue("@model", model);
            cmd.Parameters.AddWithValue("@available", aval);
            cmd.Parameters.AddWithValue("@regno", id);
            cmd.ExecuteNonQuery();
            MessageBox.Show("Record updated");
            txtregno.Enabled = true;
            Mode = true;

            txtmake.Clear();
            txtmodel.Clear();
            txtavl.Items.Clear();
            txtmake.Focus();

        }
            con.Close();
}
Method Autono()
This method sets the car registration number field to the 00000 (if there is no data read from the database), else it increments it by 1, so that the cars entered have the unique reg. no.
1
2
3
4
5
6
7
8
9
10
11
12
13
14
15
16
17
18
19
20
21
22
23
24
25
26
public void Autono()
{
    sql = "select regno from carreg order by regno desc";
    cmd = new SqlCommand(sql,con); ;
    con.Open();
    dr = cmd.ExecuteReader();

    if(dr.Read())
    {
        int id = int.Parse(dr[0].ToString())+1;
        proid = id.ToString("00000");

    }
        else if (Convert.IsDBNull(dr))
        {
            proid = ("00000");

        }
        else
        {
            proid = ("00000");
        }

        txtregno.Text = proid.ToString();
        con.Close();
}
Method dataGridView1_CellContentClick()
This method enables editing or deletes the data displayed in dataGridView1. In fact, it is an event that reacts on an user clicking on the particular parts of the gridview. If the user clicks on Edit button, the variable Mode is set to false, which enables updating of the records via the button1_Click() method previously described. Moreover, it sets the textbutton textregno as disabled (since we are editing the particular row in the table); it then reads the id value which is the first field in the datagrid current row and it passes that value to the aforementioned getid() method which enters the other text fields with the corresponding data from the database.
1
2
3
4
5
6
7
8
9
10
11
12
13
14
15
16
17
18
19
20
21
22
23
24
private void dataGridView1_CellContentClick(object sender, DataGridViewCellEventArgs e)
{
    if(e.ColumnIndex==dataGridView1.Columns["edit"].Index &&e.RowIndex>=0)
    {
        Mode = false;
        txtregno.Enabled = false;
        id = dataGridView1.CurrentRow.Cells[0].Value.ToString();
        getid(id);
    }

    else if (e.ColumnIndex == dataGridView1.Columns["delete"].Index && e.RowIndex >= 0)
    {

        Mode = false;
        id = dataGridView1.CurrentRow.Cells[0].Value.ToString();
        sql = "delete from carreg where regno=@id";
        con.Open();
        cmd = new SqlCommand(sql,con);
        cmd.Parameters.AddWithValue("@id",id);
        cmd.ExecuteNonQuery();
        MessageBox.Show("Record deleted");
        con.Close();
    }
}
Button2, which is a refresh button, loads two methods and clears the fields. In that way, the records are being displayed into the gridview. The class runs the same methods on startup as well:
1
2
3
4
5
6
public carreg()
{
    InitializeComponent();
    Autono();
    load();
}
The difference being here that the refresh button enables reloading new records on change – the new records wouldn’t be displayed without refresh button until the program’s restart.
1
2
3
4
5
6
7
8
9
10
private void button2_Click(object sender, EventArgs e)
{
    load();
    Autono();

    txtmake.Clear();
    txtmodel.Clear();
    txtmake.Focus();
}
Customer Registration
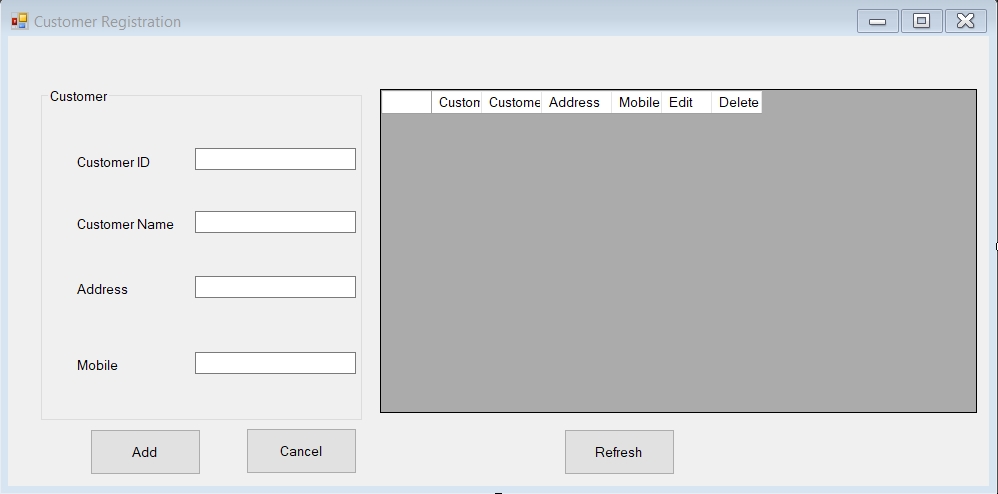
This class follows the same logic as previous one, just the names are different.
Rental Registration
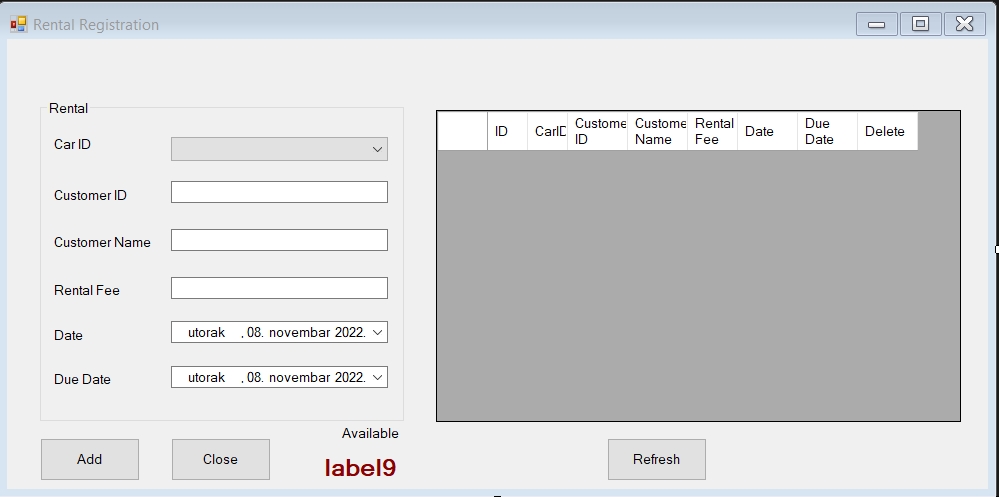
Here we have two new methods; other code is similar to previous classes. Two feats are new to explain.
Every car needs to have an availability mark; such column exists in table dbo.carreg. Idea is that cars that are taken are marked as unavailable so that the same car can’t be booked twice in the same time period. Method txtcarid_SelectedIndexChanged() queries database with the following:
1
2
select * from carreg where regno='"+ txtcarid.Text+ "' "
txtcarid is the designation for the ComboBox, so basically this query tries to get the data filtered by the given carid and to display it in the gridview. If the read from the database succeeds (meaning the data with the particular id exists), then this line:
1
aval=dr["available"].ToString();
gets the value of column available in the carreg table. If that value is no, meaning car is not available, then the other fields below the ComboBox are disabled because the data on the taken car can’t be changed. Else, those fields are editable. If the read from the database does not succeed, this means car with the particular carid isn’t entered into the database and therefore unavailable.
1
2
3
4
5
6
7
8
9
10
11
12
13
14
15
16
17
18
19
20
21
22
23
24
25
26
27
28
29
30
31
32
33
34
35
36
37
38
39
private void txtcarid_SelectedIndexChanged(object sender, EventArgs e)
{
    cmd = new SqlCommand("select * from carreg where regno='"+ txtcarid.Text+ "' ", con);
    con.Open();
    dr = cmd.ExecuteReader();

    if (dr.Read())
    {
        string aval;
        aval=dr["available"].ToString();

        label9.Text = aval;

        if(aval=="No")
        {
            txtcustid.Enabled = false;
            txtcustname.Enabled = false;
            txtfee.Enabled = false;
            txtdate.Enabled = false;
            txtdue.Enabled = false;
        }

    else
    {
        txtcustid.Enabled = true;
        txtcustname.Enabled = true;
        txtfee.Enabled = true;
        txtdate.Enabled = true;
        txtdue.Enabled = true;
    }

    }
        else
        {
            label9.Text = "Car not available";
        }

    con.Close();
}
txtcustid_KeyPress method is used when the user enters a value in txtcustid field(Customer ID) and presses key within it. If that key is a Return (KeyChar==13), then via SQL query the program fetches the data from the database. Else, a customer with entered ID does not exist.
1
2
3
4
5
6
7
8
9
10
11
12
13
14
15
16
17
18
19
20
21
22
23

        private void txtcustid_KeyPress(object sender, KeyPressEventArgs e)
        {
            if(e.KeyChar==13)
            {
                cmd = new SqlCommand("select * from customer where custid='" + txtcustid.Text + "' ", con);
                con.Open();
                dr = cmd.ExecuteReader();

                if (dr.Read())
                {
                    txtcustname.Text = dr["custname"].ToString();
                }

                else
                {
                    MessageBox.Show("Customer ID not found");

                }
                con.Close();
                }

        }
Returncar
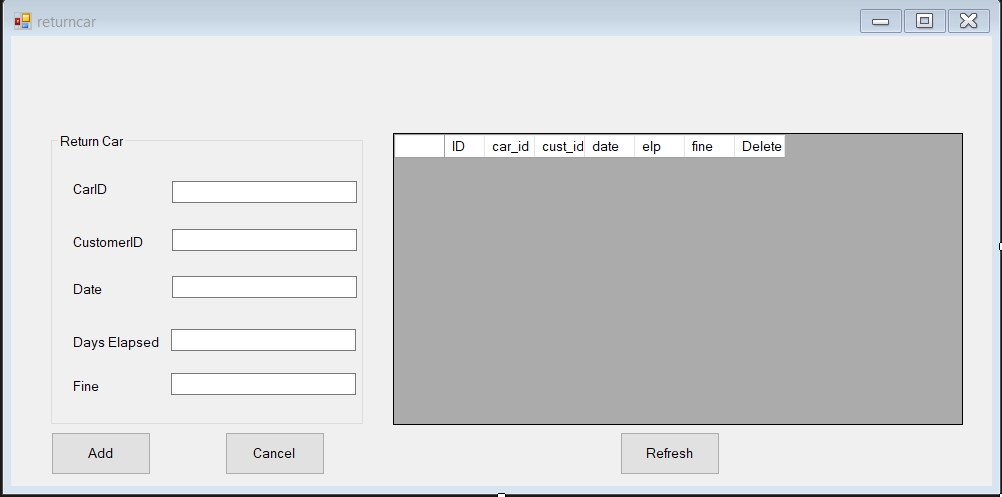
Class returncar takes into account CarID, CustomerID, Date of return, it counts the elapsed days and it calculates the fine if the number of rental days is bigger than defined in DueDate field in Rental Registration class. It has similar options to edit and delete data in the DataGridView. Let’s see how the fine is calculated. When the user enters the value into the CarID field and press an Enter, this code is being executed:
1
2

cmd = new SqlCommand("select car_id,cust_id,date,due,DATEDIFF(dd,due,GETDATE()) as elap from rental where car_id='"+txtcarid.Text+"'",con);
This SQL command will fetch the wanted data and via a SQL function DATEDIFF will calculate the difference between actual date of car return and supposed return date. If that difference is larger than 0 (if it exists), the program will calculate a fee that is times 100 of the number of passed days, else the fee doesn’t exist.
Conclusion
In order to develop a simple program like this, one should possess following knowledge:
- designing a database in SQL Server,
- connecting a SQL Server to a C#,
- writing basic SQL queries,
- using Windows Forms UI framework,
- manipulate the elements of the UI and write the corresponding code,
- finally, have a basic overview of Visual Studio in which the program is developed.
Possible improvements:
- improve user login via using trusted connection (without passing an user id and password) - current solution is prone to SQL injection attack,
- use other way to connect to the database, without having the need to manually close the connection every time the data is fetched (open connections to the SQL server are security issues as well as performance hogs).
